
1. Required Household Equipment Checklist (Under $5)
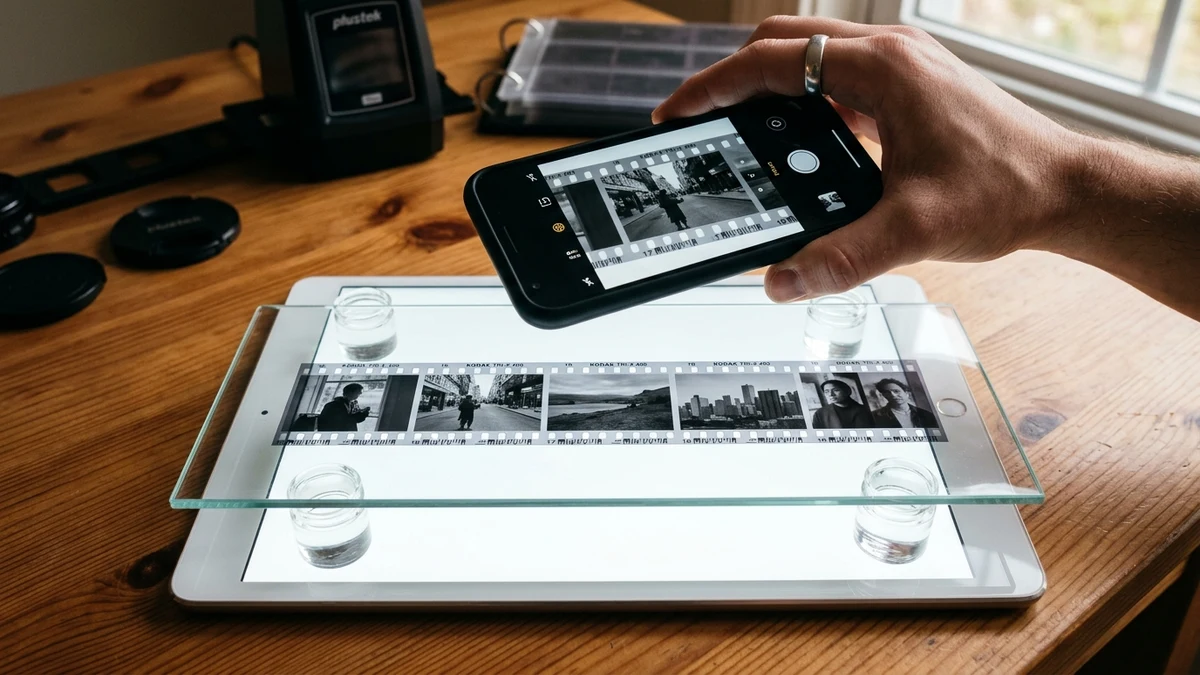
To build a zero-cost negative scanning station at home, you only need four common items: a digital screen, clear elevation spacers, an opaque cardboard film mask, and your smartphone.
1. The Backlight Screen
An iPad, tablet, laptop, or OLED phone. Launch our full-screen 5500K daylight white pad and turn display brightness up to 100%.
2. Elevation Spacers
Two clear drinking glasses, acrylic blocks, or cardboard risers that hold the film strip exactly 15mm to 20mm above the screen glass.
3. Stray Light Mask
A black sheet of paper or cardboard with a cut-out aperture matching your 24x36mm film frame. This prevents backlight flare from washing out contrast.
4. Macro Smartphone
Any iPhone or Android camera with autofocus lock. Stabilize your hands or rest your elbows on the table to eliminate camera shake.
2. Why You Must Never Lay Negatives Directly on a Screen
Placing a film negative directly on an LCD or OLED screen causes optical moiré: the camera lens simultaneously resolves the film grain and the screen's discrete red, green, and blue subpixel stripes.
Every digital display creates white light by illuminating tightly grouped red, green, and blue subpixels. When a macro camera lens focuses on film laid directly on the screen, these subpixels appear as distracting diagonal rainbow grid lines across your photograph.
By lifting the negative at least 15mm away from the screen, the display falls far outside the camera's shallow depth of field. The subpixel matrix blurs into a perfectly smooth, uniform daylight diffusion field before reaching the film emulsion.
3. Step-by-Step DIY Scanning Tutorial
Follow these four simple steps to capture sharp, well-exposed negatives using your screen light table:
- Step 1: Set Up the Lightbox Screen: Open our Fullscreen 5500K Pad on your tablet or laptop. Maximize brightness and wipe the screen clean of dust.
- Step 2: Position Your Spacers and Mask: Place your 15mm spacers on the screen. Lay the black cardboard aperture mask over the spacers and position your negative strip centered over the cut-out.
- Step 3: Lock Focus and Exposure on Your Phone: Bring your smartphone 3–4 inches above the negative. Tap and hold the screen to lock AE/AF (Auto-Exposure / Auto-Focus). Lower exposure slightly so highlights do not blow out.
- Step 4: Invert Your Captured Photo: Take the photo and drop it into our Photometric Inversion Studio to neutralize the orange base and reveal full-color portraits.
4. Common DIY Mistakes to Avoid
Avoid ambient room glare, dirty screen smudges, and curved film curling to ensure your DIY scans look crisp and professional.
- Scanning in Bright Room Light: Turn off overhead ceiling lights and close window blinds. Ambient light bouncing off the glossy side of the negative ruins black levels and creates reflections.
- Overheating Your Phone: Keep the camera 3–4 inches away. Do not press the phone against the film.
- Curled Film Negatives: Vintage film strips stored tightly wound in canisters often curl upward. Use two clean glass microscope slides or acrylic strips to gently flatten the film edges over the aperture.
5. Color Temperature Calibration & Diffusion Techniques
Consumer tablet and laptop screens default to cool white points between 6500K and 7500K. To achieve accurate color rendering for analog film, calibrate your display to photographic standard 5500K.
Using our built-in 5500K Daylight White pad guarantees a standard D55 spectral distribution. If your screen's pixel grid remains faintly visible even at a 15mm elevation, insert a sheet of matte drafting paper or milky translucent polypropylene diffusion sheeting between the screen and your spacers. This scatters the directional LED emission into a perfectly isotropic lambertian surface, ensuring edge-to-edge illumination uniformity across the entire 24x36mm frame.
01 Why must I elevate the film above my tablet screen?
Digital screens are composed of thousands of individual red, green, and blue subpixels. If you place a film negative directly on the screen, your camera lens will focus on the screen's pixel grid rather than the film grain, creating severe moiré interference patterns. Elevating the film 15mm to 20mm blurs out the subpixels completely.
02 Can I use window sunlight instead of an iPad or tablet?
While window daylight has a high CRI, it varies unpredictably in color temperature (from 4000K to 8000K) and changes intensity as clouds pass. A calibrated screen light table provides consistent, repeatable 5500K daylight-balanced illumination across your entire scanning session.
03 What household items make good elevation spacers?
Clear acrylic blocks, upside-down glass petri dishes, clear drinking glasses, hollow cardboard rings cut from paper towel tubes, or rolls of transparent tape make ideal spacers. Ensure the spacer elevates the negative at least 15mm above the screen surface.
04 Do I need a special macro lens to scan negatives with my phone?
No. Modern smartphones (iPhone 13 Pro and newer, Samsung Galaxy S21 Ultra and newer) feature automatic macro switching that focuses as close as 2 centimeters. For older smartphones, an inexpensive $15 clip-on macro lens provides exceptional center sharpness.